Make sure to check the minimum system requirements before moving on with the installation process.
Now there are two ways you can install the PostX Gutenberg blocks plugin. Out of the two, the Automatic Installation process is easier.
Automatic Installation
***Installation and activation of the Pro version requires both the free and Pro version of the PostX plugin. You need to have both of them installed on your WordPress site to activate the license and use the pro features.
Here’s how to install and activate the pro version.
The process is very simple:
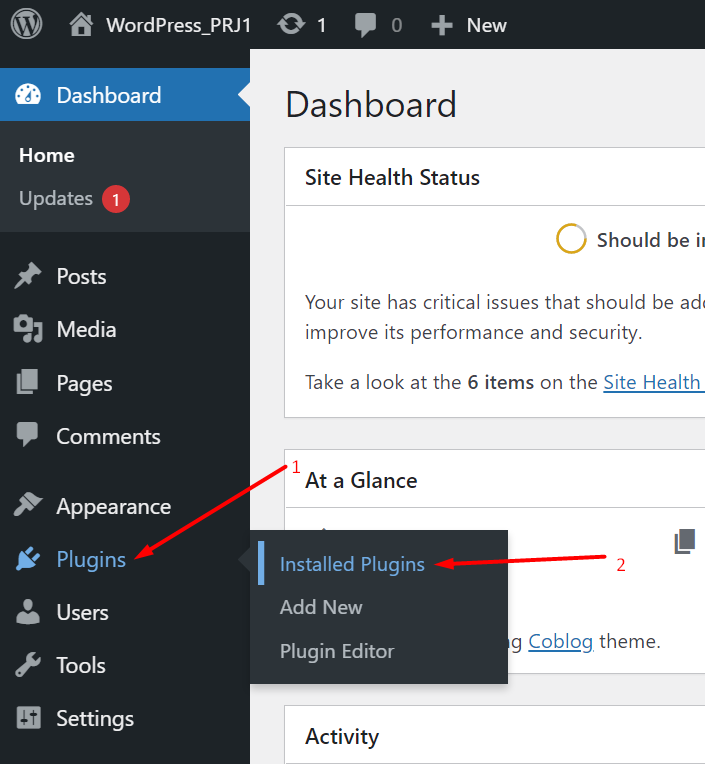
- Go to the “Plugins” section on your WordPress dashboard.
- Then click on “Add New”.
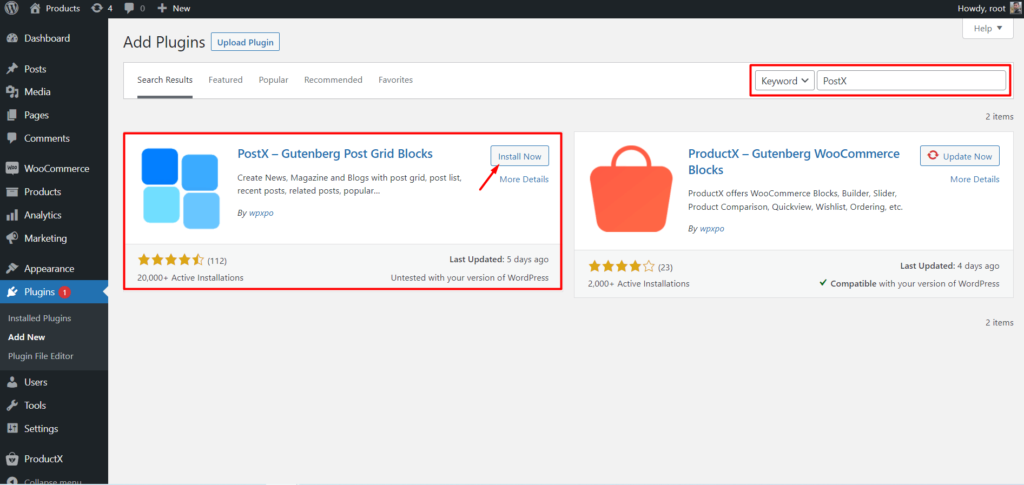
- On the right search panel type in “PostX”
- You should now see the PostX-Gutenberg Post Grid Block plugin.
- Click on “Install”.
- Then you can click on the highlighted “Activate” button.
You are now ready to enjoy the features of the PostX WordPress Gutenberg plugin.
Note: Please note that you need to have the free version of the plugin installed on your WordPress site to install the pro version of the plugin. You will need to download the pro version of the plugin from the WPXPO website. Please go to the Pro Version Installation Section to learn more about the process.
Manual Installation
The manual installation process is also easy enough to understand.
- First of all, you need to download the PostX plugin file from the WPXPO-PostX plugin page.
- The rest of the process is almost similar to the automatic installation:
- Go to the “Plugins” section on your WordPress dashboard.
- Choose “Add New”
- Now you will see an “Upload” button somewhere at the top left. Click on it.
- Finally, you add the plugin file from your machine’s download directory.
- You can now activate the PostX WordPress plugin.
Installation Via FTP
This process is for those who want to get a more hands-on feel with WordPress.
- First, download the plugin from the WPXPO website.
- Unzip the files.
- You can either access your cPanel or your FTP program to navigate your WordPress installation directory.
- Go to Wp content>plugins>directory.
- Upload the plugin files to the directory.
- You will now be able to activate the PostX plugin from the using “Plugins” panel on your WordPress dashboard.